
Short answer
Choose a backup folder, create the first backup and confirm that the new file appears.
Keep a protected copy on another physical device. If the database is ever damaged, the app can offer a valid automatic backup during startup.
This guide covers Osenpa Clipboard Manager. Check requirements and download options before you begin.
On this page
When to use this method
Use this workflow for local database backups and damage recovery. It does not provide cloud sync, whole-PC backup or disaster recovery. Regular history remains unencrypted, so protect the backup folder like the live database.
Choose the right kind of copy
-
App backup
The app creates a database backup and verifies its integrity. Locked Notes remain encrypted inside it; regular history remains unencrypted.
-
JSON export
Export JSON transfers supported text records, tags, Smart Collections and saved Stack Profiles for later import. Ordinary History images, rich payloads and file-snapshot bytes are omitted; Locked Notes are omitted too. Saved Stack Profiles can contain their own embedded content. There is no export privacy-selection dialog, so review the file and protect it like regular history.
-
CSV or Favorites-only export
CSV is useful for a readable table, not for recreating every rich clipboard payload. A Favorites-only JSON export is useful when you need those lasting items without the full history.
Backup and recovery behaviorDatabase consistency, restore safeguards and off-device risk.
- How recovery works
- Automatic backup remains disabled until a directory is configured. When startup detects damage, recovery checks automatic backups, chooses the newest valid copy and preserves rollback material before activation.
- Important limit
- Seven rotating copies on the same failing SSD are not an off-device backup. Place at least one protected copy on independent storage and verify it before an emergency.
Create and verify a recoverable copy
-
Select a separate destination
Open Settings. Choose Backup. Select a folder outside the active application-data directory. You should see the folder path in Backup settings. A second folder on the same SSD protects against accidental file deletion but not a failed, lost or encrypted drive. Keep another copy on independent, access-controlled storage.
-
Set interval and retention
Choose an interval from 1 to 168 hours. Choose how many copies to keep, from 1 to 30. Select Save Schedule. You should see the saved values remain in Backup settings.
Why this matters: The starting values are 24 hours and 7 copies. A shorter interval limits potential loss but writes more often. More retained copies improve the chance of finding one made before unnoticed damage.
-
Create an immediate checkpoint
Select Back Up Now. Wait for the Backup created message, then find the named, timestamped database in the selected folder. A saved schedule is not evidence that the first backup already exists. If the message reports a failure, check that the folder still exists, is writable and has free space, then retry and check the new message.
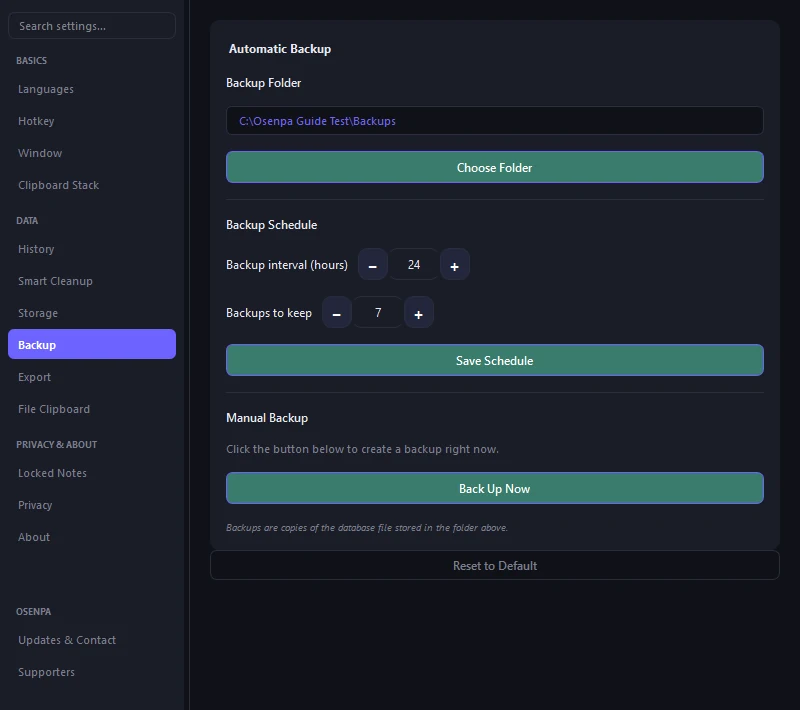
Choose a separate folder, save the schedule and create the first backup with Back Up Now. -
Check the backup file
Open the selected backup folder in File Explorer. Confirm that the newest backup has a recent time and a nonzero size. This shows a file was created; it does not by itself prove that every item can be recovered. Do not rename a random SQLite file to make it look like an app backup.
-
Keep one copy away from the PC
Copy a recent backup to a protected external drive or another trusted device. Eject removable storage safely. You should see one backup in the app's folder and one independent copy.
Respond to a database-health warning
The app checks database health weekly and after an unclean shutdown. If it detects damage during startup, it opens a recovery dialog. This is when restore choices appear.
-
Do not overwrite the damaged database
The recovery flow preserves the damaged database family instead of silently replacing it. Keep those files until a verified restore works or a specialist confirms they are unnecessary.
-
Read every recovery choice
Restore verified backup appears only when a usable backup was found. It uses the newest automatic backup that passes the database check, so copies made after that backup can be missing. Start empty creates a clean database; it does not recover history. Choose Exit safely if no usable backup is offered and you still need the old data. Keep the preserved files instead of replacing them by hand.
-
Import only after the app is stable
If you also have a JSON export, use the app's Import command only after history opens normally. Make a database backup first. Import adds supported records and skips duplicates or unsupported records. A later error can leave earlier records imported, so check the reported counts, History, collections and profiles before deciding whether to retry.
Recovery gaps
- Leaving the backup directory unset
- Keeping every copy beside the live database
- Assuming Backup settings contain a manual restore picker
- Assuming retention protects against physical drive loss
Checkpoint: prove the backup
- Confirm the destination differs from live storage.
- Create and timestamp one manual backup.
- Confirm the backup file has a recent time and nonzero size.
- Keep one independent copy away from the live database.
- Know that restore choices appear only after detected damage.
Changing the live database path is not a restore
A database-path change takes effect after the app restarts and does not silently move existing history. Record the old and new paths, make a verified backup, and use the recovery dialog or import flow when data must move. Simply pointing at an empty location can make the app appear to have lost history even though the old database is still elsewhere.