
Short answer
Open PowerShell in the standalone installation folder and convert one copied test file before you automate
a folder. These steps use the standalone installation's accessible cli folder.
This guide covers Just Converter. Check requirements and download options before you begin.
On this page
When to use this method
The command-line interface, or CLI, is useful for repeatable local jobs and scripts. It does not turn unsupported input into a valid conversion and it should not expose passwords or private contents in logs.
What you need before using the command line
- The standalone installation of Just Converter.
- One copied test file and one writable output folder.
- PowerShell, which is included with Windows.
The Microsoft Store package does not register a PowerShell command alias. This path-based workflow is for
the standalone installation, where JustConverter.Cli.exe is in the cli folder.
Build a reliable command
-
Open PowerShell in the installation folder
In File Explorer, open the installation folder. Click its address bar, type
powershell, and press Enter.You should see: a PowerShell window whose prompt ends with the installation folder.
-
Check the command-line tool
Run
.\cli\JustConverter.Cli.exe --help.You should see: the
convertcommand and its available options. -
Convert one copied test file
Put a copied
photo.pngin a folder namedConversion testunder your Pictures folder. The quoted paths below allow spaces. Adjust them if your Pictures folder is elsewhere.$inputFile = "$env:USERPROFILE\Pictures\Conversion test\photo.png" $outputFolder = "$env:USERPROFILE\Pictures\Converted test" .\cli\JustConverter.Cli.exe convert ` --input $inputFile ` --format jpg ` --output $outputFolder ` --collision renameCopy the whole block. The backtick at the end of each command line continues it on the next line; do not add spaces after it.
You should see: a separate JPG in
Converted testand a success result. Open the JPG before converting more files. -
Add recursion deliberately
Use recursive discovery only when nested folders are intended.
You should see: nested files in the result only when you supplied
--recursive. -
Choose collision behavior
Select rename, overwrite or skip explicitly instead of relying on an assumption.
You should see: each existing name handled by the option you chose.
-
Read JSON and exit codes
Add
--jsonwhen a script needs the result. Capture the exit code immediately, then inspect the per-file status and output paths:$inputFile = "$env:USERPROFILE\Pictures\Conversion test\photo.png" $outputFolder = "$env:USERPROFILE\Pictures\Converted test" $json = .\cli\JustConverter.Cli.exe convert ` --input $inputFile ` --format jpg ` --output $outputFolder ` --collision rename ` --json $exitCode = $LASTEXITCODE $result = $json | ConvertFrom-Json $exitCode $result.files | Select-Object inputDisplayName, status, outputs, safeErrorCodeYou should see: one result entry per input. A startup or validation error can return an exit code without JSON, so check the error message if parsing has nothing to read.
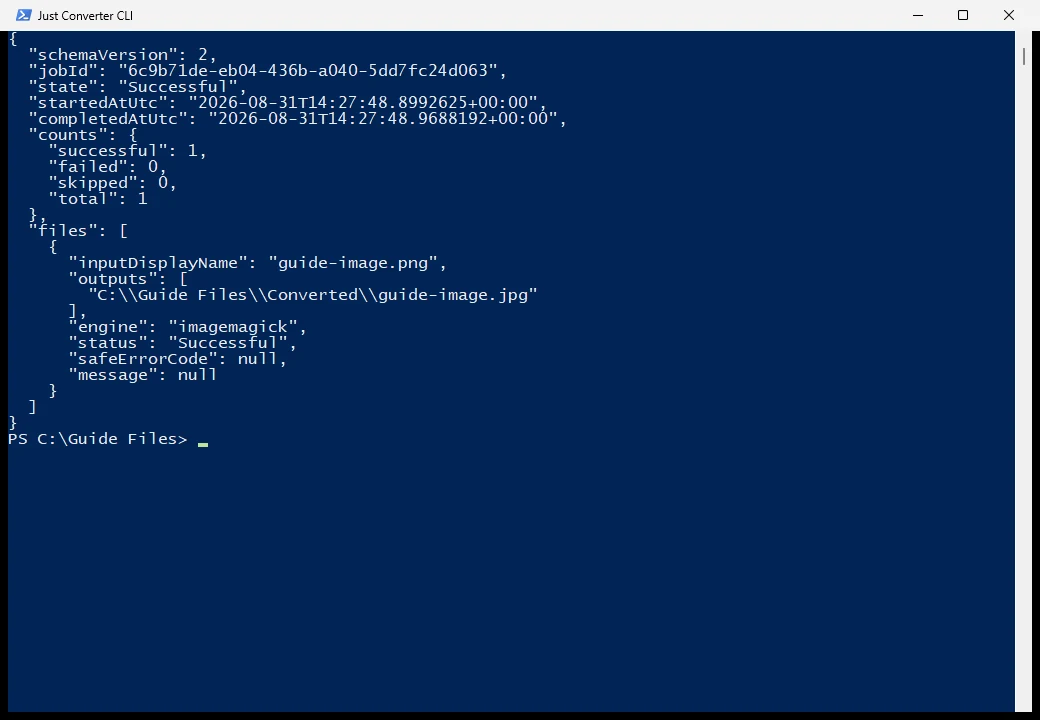
Check the state and per-file status, then open the output path shown in the result.
Command-line behaviorSupported inputs, machine-readable results and the final output check.
- How it works
- The command accepts input paths, format, output, profile, collision mode, recursion and JSON output through a documented contract. It returns structured JSON and an exit code that a script can read.
- Important limit
- Shell success is not a fidelity check. A script must inspect the returned status and validate the created files.
Documented command shape
Replace each value in angle brackets, such as <path>, with the path, format, or other value your job needs.
Scroll the table horizontally on a narrow screen.
| Part | Example |
|---|---|
| Command | .\cli\JustConverter.Cli.exe convert --input <path>... --format <format> |
| Optional output | --output <directory> --profile <id> |
| Collision and discovery | --collision rename|overwrite|skip --recursive |
| Machine-readable status | --json |
| Exit codes | 0 success; 1 usage or validation error; 2 no successful outputs; 3 partial success; 4 canceled; 5 required engine missing; 6 security or resource limit; 7 input/output or system failure |
If the command fails or returns mixed results
Read the JSON result for each file before looking only at the final exit code. Check quoted paths, the chosen operation, output permissions, collision behavior and optional components. Read $LASTEXITCODE immediately after the converter command, before another native command changes it. Do not treat a created
file as proof of success until the result status and the file itself both pass inspection.
Command-line automation mistakes
- Logging passwords or private file contents
- Using overwrite before checking the destination folder
- Ignoring nonzero exit codes or per-file status
Command checkpoint
- Before adding recursion or a scheduler, test one representative file. It should return exit code 0, include a successful JSON entry and create an output that opens correctly.
- The returned output paths and skipped-file messages match the chosen collision policy; JSON does not provide a separate log of every rename or overwrite.
- If the exit code, JSON status or opened file disagrees, stop and inspect the command and per-file result.