
Short answer
A macro is a saved list of actions. Record one clean example, review every captured action and test it once before adding repetition. The starting window, focus and timing still matter because playback sends input to the active desktop.
This guide covers Osenpa Auto Clicker. Check requirements and download options before you begin.
On this page
When to use this method
Use recording for a short sequence of clicks and typing that you can show once. This example types Sample and moves to the next field. Playback needs the target window visible; it is not background app control.
Record and replay one short example
-
1. Describe the result before recording
For this test, the result is "Type Sample in one empty text field, then press Tab once."
-
2. Prepare the visible desktop
Open one disposable test form with an empty text field and a second control that Tab can reach. Put its cursor in the first field. A window has focus when it is the one receiving your typing and clicks. Close notifications that could cover the test window. Save any existing workflow before adding the practice recording.
-
3. Choose privacy and capture options
Open Record Actions. Choose the selected test window if the recording should stay inside it. Enable Keyboard, Clicks and Merge typed text for the sample below. Leave Mouse movement off. Keep Redact all typed text off only for this invented sample; that option would omit its printable characters. You should see the selected window named in the recorder.
-
4. Record one regular example
Select Start Recording and wait for the countdown. When recording begins, click the test field, type
Sampleand press Tab once. Stop recording. You should see the review dialog. Avoid correcting unrelated work because those corrections would become replay steps. -
5. Review every captured action
Keep the click into the field, the
Sampletext, Tab and the delays needed for the form to respond. Remove any unrelated actions. The text may appear as several text or key actions, especially when modifier keys were used. Read them in order before confirming.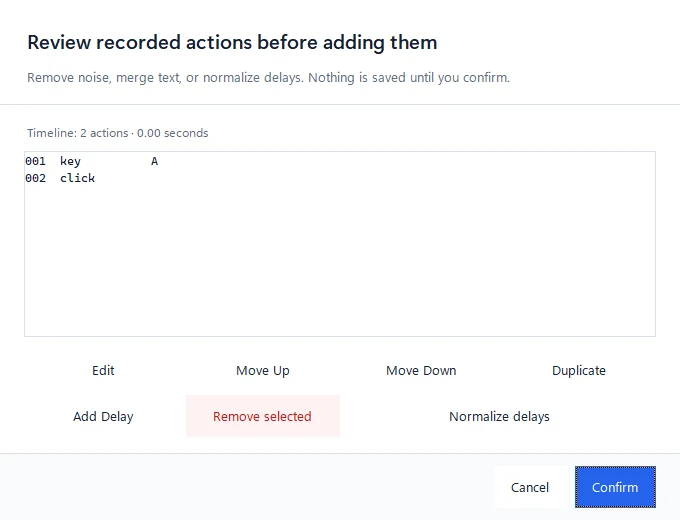
This short practice recording contains a key and a click. Your Sample-and-Tab example may have more rows.
- Action list: read the rows in the order they will replay.
- Edit or Remove selected: correct the chosen row before adding it.
- Confirm: add the reviewed actions to Steps. Cancel leaves the workflow unchanged.
-
6. Add the reviewed actions
Select Confirm to add the reviewed actions to Steps as one undoable change. Choose Cancel to leave the workflow unchanged.
-
7. Test one run
Clear the test field and put focus back on the same starting window. Set Run Options to one cycle and keep unrelated steps disabled for this test. Use the configured Run key. Keep F12 available as the permanent Emergency Stop. You should see Sample entered once, with focus moving to the next control after Tab. Add a loop or schedule only after this clean replay works.
Recording and replay limitsWhich actions can be recorded and why timing still needs a test run.
- Recorded actions
- A recording can include keys, clicks, Mouse 4 and Mouse 5, drag, vertical or horizontal scroll and optional pointer movement. The review screen lets you edit, select, reorder, duplicate or remove captured actions before adding them as steps.
- Important limit
- If a window opens more slowly during replay, the next step can arrive too early. Keep a deliberate delay or wait for a stable visual condition.
Why focus and timing still matter
Recorded actions repeat input; they do not understand a button or text box. Stop if another window takes focus, a page loads slowly or an elevated app rejects the input.
Keep a deliberate delay or use a tested image or color condition when loading times vary. Input Variation adds occasional pauses after completed actions; it leaves keys, text and click positions unchanged and does not replace a condition.
Before the next replay
Clear the practice field and return focus to its starting control. A second run should type Sample once and move to the next control. Replaying into a field that already contains text can add another copy.
If the recording or replay is wrong
Choose Cancel in the review dialog if the draft contains unwanted input; it adds nothing to Steps. Return the form to its empty starting state, select the intended window again and record a new short example.
If a confirmed replay types twice or reaches the wrong control, press F12, inspect the form and clear the practice text before retrying. Check for duplicate enabled steps, stray clicks and removed delays. Undo changes the workflow document; it does not reverse text or clicks already sent to the target.
Keep the practice recording small
Use invented text and only the form needed for the test. Notifications, unrelated clicks and missing delays can change the result. A short recording is easier to inspect and correct.
Replay checks
- Confirm that every step is intentional.
- Test from the same starting window, state and focus.
- Verify that the configured Run and Stop key works, then press F12 once in a harmless test to confirm Emergency Stop.
- Confirm the expected result, not only the number of actions.
- Re-test after changing display settings, focus, permissions, the target app or its starting state.