
Short answer
In Osenpa PDF Tools, open Convert > Have images -> want PDF. Add your JPG or PNG pictures, put them in page order and choose Create PDF. One picture makes one page; several pictures can become one PDF.
This guide covers Osenpa PDF Tools. Check requirements and download options before you begin.
On this page
When pictures need to become a document
Use this for photographed notes, scanned pages or a group of images you want to share as one file. JPG and JPEG are two names for the same image format. PNG pictures can join the same PDF.
The words remain part of each picture. To make them searchable or copyable, use OCR after creating the PDF.
Have your pictures ready
- Keep the original pictures and decide their page order.
- Rotate any sideways source pictures before adding them.
- If the recipient asks for A4 or US Letter pages, note that requirement.
Example: send three pages of notes
Suppose you photographed three pages. Name them notes-01.jpg, notes-02.jpg and notes-03.png. Add all three, check the displayed order and save the result as notes.pdf. It should contain three pages, in that order. The names are examples; the app uses the order shown in its list.
Create your PDF
Add the pictures
Open Convert > Have images -> want PDF, then choose Add images. Select the pictures that belong in the document.
Put the pages in order
Check the list from top to bottom. Use Up and Down to move a picture. Include each intended page once.
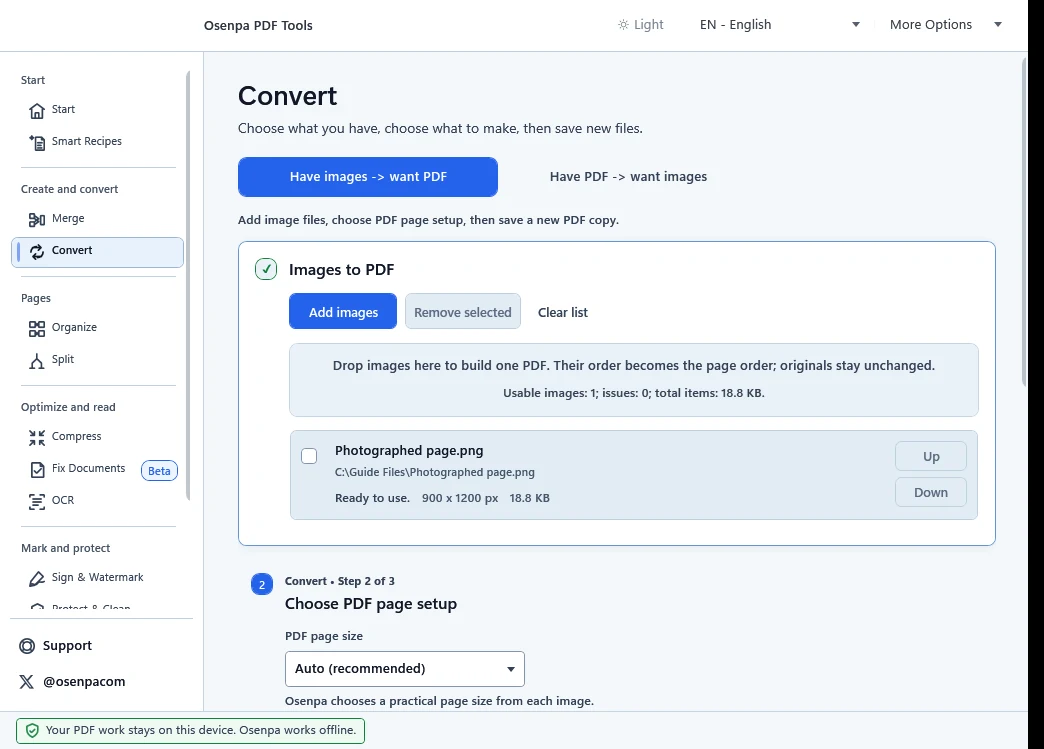
This example has one picture loaded. Look for Add images above the list and PDF page size below it. Up and Down become useful when you add more pages. Choose the page setup
Choose PDF page size: Auto, A4, US Letter or Fit to image. Review Page margin, Orientation and Image quality. The app fits each picture without cropping or stretching it, so a picture can have blank space around it.
Create and open the file
Choose an output folder and filename, then select Create PDF. Open the new PDF and check the page thumbnails before sharing it.
Which pictures can you add?
JPG/JPEG, PNG, BMP and WebP are supported. TIFF must contain a single image; separate the frames of a multi-frame TIFF first.
Each picture becomes one PDF page. Transparent areas become solid, and the Image quality setting can change small details.
If a page does not look right
If a page is sideways, rotate the source picture and rebuild the PDF. If small writing looks blurry, use a clearer source picture or try a higher Image quality. Enlarging a blurry picture cannot restore missing detail.
For a tilted photo, uneven lighting or shadows, follow the document photo cleanup guide before arranging the pages.
If the file must fit an upload limit
A PDF is not automatically smaller than its source pictures. First make sure the pages are readable. Then follow the PDF size-limit guide if the recipient needs a smaller file.
Check before sharing
- The page count matches the number of pictures, and every thumbnail is in order.
- Open pages with small writing and check that all four edges are present.
- The result opens normally and meets any page-size or file-size requirement. Keep your original pictures.