
Short answer
Open Mouse and choose the left button. Select Fixed coordinates, then use Pick Target on a harmless spot. Set Interval to 1 SEC and Repeat to 1, with Infinite off, then select Run Once. Keep the target visible and stay at the computer. F12 is Emergency Stop.
This guide covers Osenpa Auto Clicker. Check requirements and download options before you begin.
On this page
Before you start
Use Windows 10 build 19041 or later, or Windows 11, on an x64 PC. For this example, open a disposable document, type Click practice, and leave its text area visible. Clicking inside this document only moves the typing cursor. Save your other work first.
Keep the test window visible and stay at the computer. The app sends real mouse and keyboard input to the active desktop. Use this practice document before trying a task that changes files, accounts or payments.
Set up your first repeated click
-
1. Open the Mouse tool
Open Osenpa Auto Clicker and select Mouse. This tool holds the click position, button, Interval and Repeat settings.
-
2. Choose the mouse button
Choose Left for this example. Right, middle, X1 and X2 are available for tasks that need them; X1 and X2 are the side buttons on some mice.
-
3. Choose the position
Choose Fixed coordinates, then Pick Target and select a spot inside the
Click practicedocument. Check the X and Y numbers in Mouse and leave the window in that position. Current cursor position instead uses wherever the pointer is when the action runs. -
4. Set a slow interval
In Interval, enter 1 and choose SEC. The initial unit can be MS, which means milliseconds, so check the unit as well as the number. The interval is the pause between clicks, not a countdown before the first click.
-
5. Set a small repeat count
Set Repeat to 1 and leave Infinite off for the first test. Try a small repeat count only after one click works correctly.
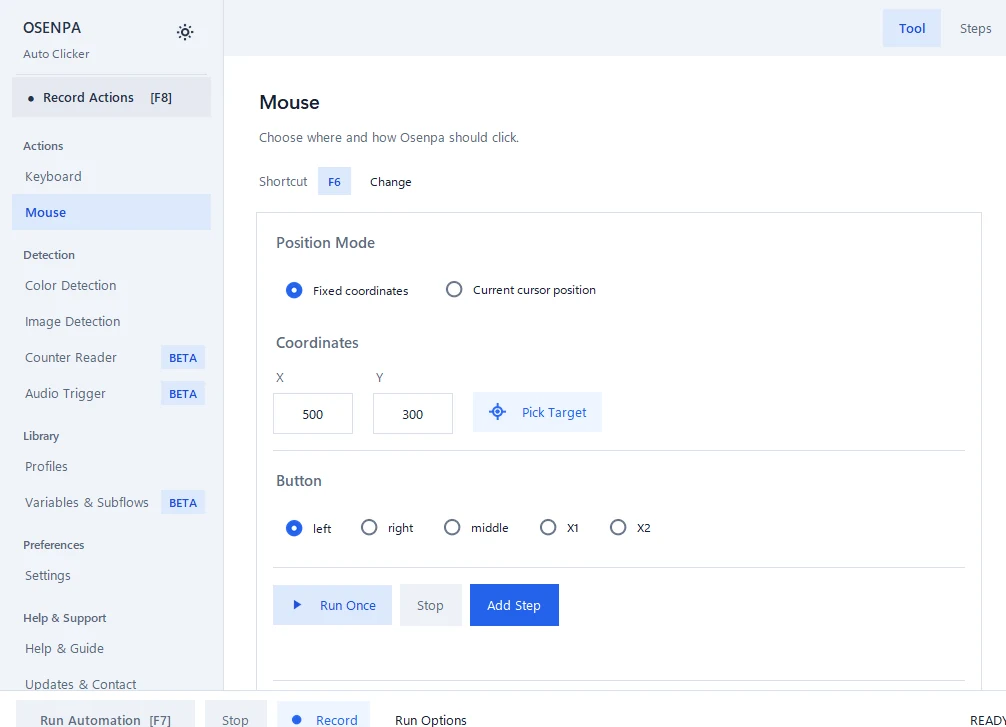
Use Fixed coordinates and Pick Target to choose the spot. Run Once tests the settings; Add Step saves the action to Steps. -
6. Run once before saving a workflow
Select Run Once. The typing cursor should move to your chosen spot in the practice document once. Press F12 if another window takes focus. This tests the Mouse settings without adding a saved step.
-
7. Add the action as a step
When the single action is correct, select Add Step. You should see one new Mouse step in Steps. You can name, edit, duplicate, move, disable or delete it later. Add a delay or visible condition before repeating a step whose completion time changes between runs.
Ready to repeat?
After the single click reaches the right spot, try Repeat 3 on the same practice document, with Interval still at 1 SEC and Infinite off. Watch the clicks finish before trying a longer task.
Know the stop controls
F7 is the default Run and Stop key, but it can be changed in Settings. F12 is permanently reserved for Emergency Stop. F12 cancels active automation, recording, tests and scheduled work, then releases any key or mouse button the app is holding. Test Emergency Stop once with a harmless two-step workflow so you know what it feels like before an important task.
What happens on the desktopInput, permissions and scheduling boundaries.
- Only one task that produces keyboard or mouse input can own input at a time.
- Windows can block input to an elevated application unless Osenpa Auto Clicker is also elevated.
- A schedule can start once at a local time or repeat at an interval up to seven days, but the app must remain open.
- Secure Desktop, minimized windows and protected screen content are outside the reliable visible-input workflow.
Optional: Input Variation
Optional pauses with Input Variation
Input Variation is off by default. When enabled, it occasionally adds a short pause after an action finishes. Your keys, typed text and click positions stay the same.
It does not change image, color, number or sound matching settings. Keep your normal delays and stop controls. See how to control these pauses and check the session log.
If the click misses or does not run
Press F12 first and inspect the target window. Stop does not undo a click already sent. Return the window to its starting state, select Fixed coordinates and use Pick Target again. Keep Repeat at 1 and Infinite off while you retry.
If the app reports invalid values, check the X and Y numbers, Repeat and the Interval unit. If another task is active, stop it before using Run Once. When Windows blocks input to an elevated target, resolve that permission difference before repeating the test.
When to pick the target again
Moving the window, switching monitors or changing display scaling can move the saved spot. Pick the target again and test one click after those changes. For a button whose position changes, use the image detection guide.
Safe setup checks
- The correct button and position are selected.
- The interval is slow enough to observe.
- One limited run reaches the expected result.
- F12 stops a harmless test immediately.
- Re-test after changing focus, permissions, display layout or the target app.